FZ6 “Naked Conversion”

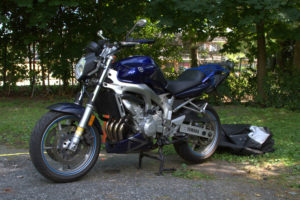
After being tempted for a very long time, I’ve finally decided to pull the trigger on naked conversion of my FZ6, and over the course of a few days of my vacation, I was able to complete it designating only a couple of hours a day.

transition

Parts List:

– MT03 headlight bought on ebay with cheapo brackets

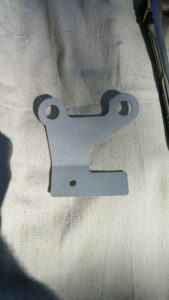
– Speedometer bracket made by a fellow 600riders.com member Puttin Along

– Speedometer cover bought on ebay

– Bracket extension and turn signal holder that I made out of aluminum

– Rizoma Dynamic mirrors + Rizoma mirror adapter from motostrano.com

– Black Emgo Universal mirror mount from Amazon

– Set of electrical connectors matching my bike’s from corsa-technic.com

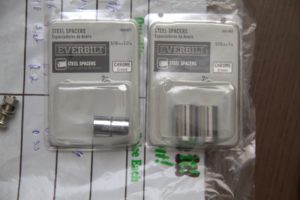
– 2 pairs of cylindrical spacers

– Button-head socket cap M6 screws: 2x30mm, 4x20mm, 4x15mm with washers, lock washers and nuts


Headlight:

I’ve ordered the headlight from ebay, and it was delivered within 6 days (including a weekend in between).

The headlight is LSL MT-03 headlight. I opted for this particular item because I couldn’t justify spending $400+ on the same headlight with higher quality brackets sold by moto-madness. If I could – I’d definitely do it.

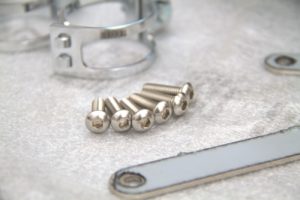
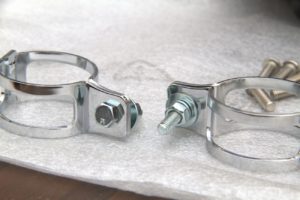
The kit comes with 2 brackets, 2 43mm fork clamps and 6 button head socket cap screws:

MT03 ebay kit

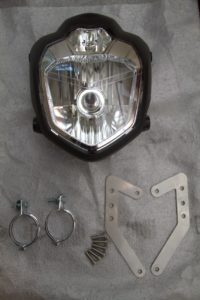
The brackets are relatively cheap, bear traces of fabrication, but seem to be sturdy enough:

brackets and screws back of brackets brackets, screws and clamps

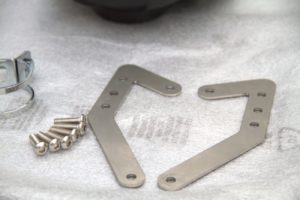
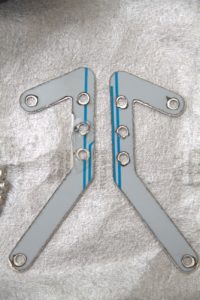
My guess is that intention here was for these brackets to “hug” the headlight (horizontal distance between upper attachment points is greater than between lower points), but since I already had to buy spacers to have brackets aligned with forks, I chose sizes that allowed brackets to stay straight. The sizing is of by a few millimeters (I got 1/2 inch and 1 inch), but it’s much better, in my opinion, than what it would be otherwise. Because of the spacers, I had to buy longer screws.

Yes, they are from Home Depot. No, these are the only parts I got there, and only because I was at HD for another project.

spacers

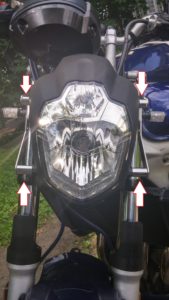
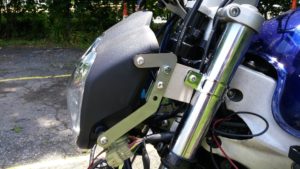
Here is the resulting look with spacers highlighted:

spacers installed

The next on “to fix” list is screws that came with clamps – replaced them with the stainless steel ones that I now had as spares:

clamp bolts

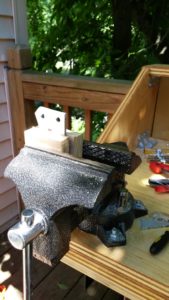
Next comes, the most labor-intensive part, at least for my version of installation. As I mentioned above, if brackets are attached to the clamps, the only way to install the headlight on fz6 is much further down the fork so that the headlight “clears” the ignition lock cylinder. This would also mean moving the horn elsewhere (now, I am going to replace it with something a little louder, but that’s in the future). Instead, I decided to fabricate my own spacers out of aluminum (Yes, it’s from Home Depot, no, it’s not a part, so I wasn’t lying when I said that spacers were the only parts I bought there).

I scientifically guesstimated (by holding the headlight with bracket next to the forks and measuring) that I needed about 3 cm of space between the center of clamp bolt and the hole in the brackets, but I also wanted to mount my turn signals somewhere, so the total offset is 39mm. I chose two attachment points on bracket so that it keeps the angle constant. The other end is wide enough and square, so it sits against the clamp and doesn’t rotate even with vibrations.

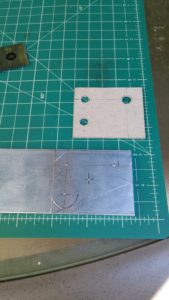
First, I’ve put together cardboard mock-ups that would let me judge the angle and distance:

cardboard

cardboard upclose

That looked like a decent fit, so I went ahead with aluminum. No CNC machine for me, so good-old fashion hand tools. In process, I learned that Dremel 400 is NOT the right tool of choice for cutting aluminum – I was faster with a hand saw. Somebody more used to work with tools would probably know that, but I didn’t:

0629161306

0629161355

Electrical:

With extension done, it was time to figure out electrical. I chose the more difficult way – I planned for making changes reversible, so I wanted to make a shorter replacement for the harness, rather than cutting the harness or the wires on the bike. I decided not to use the original harness and re-route wires, as I didn’t find enough space inside the frame to fit two connectors. I had ordered the connectors from corsa-technic.com (I found out about it from 600riders.com, just like tons of other useful info) and went to re-create the harness.

0630161134

0630161311a

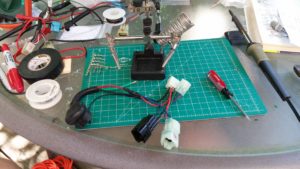
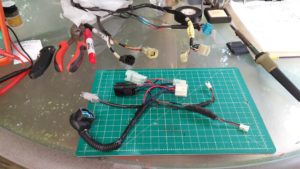
No major issues, the only thing that was difficult was having to deal with only 4 colors of wires (red, black, green, blue), and not wider variety – in retrospect, I should’ve ordered additional colors – I had to use black permanent marker for stripes (not sure if it will withstand the test of time) and documenting the new harness took a while. Here is what it looks like now, but I’ll be making a more official version in Visio, because in 2 weeks I won’t be able to decypher what I wrote there.

0701161625

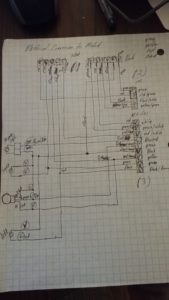
After some thorough testing side-by-side with the original harness and wiring schema, I wrapped it all up in lots and lots of insulation tape.

Speedometer:

Well, this one was the easiest, by far. Fellow 600riders.com forum member Puttin Along started puttin together (see what I did there?) brackets for S1 speedo, so I ordered one. It came by mail in 3 days, and it fit perfectly:

Here is the bracket:

0627160921

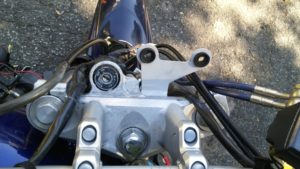
And here it’s installed:

0627160924

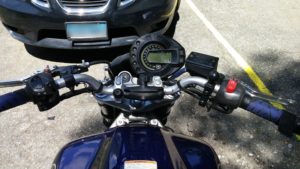
The back cover came from ebay – I only had to remove the bottom piece to install. Here is what it all looks like assembled:

0630161418a

And here is the look from above:

0630161419-2


Mirrors:

I really want to like them – these are Rizoma Dynamic mirrors, afterall – fantastic finish, great design, stylish, but… what am I supposed to see in them? I think these are one step too far in the wrong direction on style-function continuum. That’s just me, but I need to see a bit more of what’s behind me. I’ll ride with them for a few days, but I think I’m going for a different model.

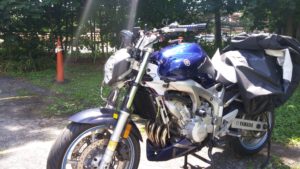
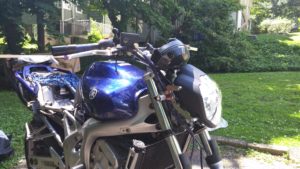
So, here is the after:

After


MiG Mods – Day 2

Day 2. Installing HID kit

As I mentioned before, I ordered a 4300K Blue Angel Eye HID kit from seller hot-bid88 on ebay. The kit took exactly 10 days to arrive. Here is the kit:

Found the kit at my doorstep after going out with friends, still a little buzzed, so decided to go right at it. By the time i was done with wiring it was 2 am.
Here is the cowling at the beginning of my night. I’d already mounted Stebel Nautilus horn on the left side. As you can see from the picture, Boneman’s Mods site is the essential guide. Big thanks, Boneman – I’d never think these things were even possible.

Here is the end result:

This kit has only one controller which I mounted on the right side, with relays for angel eyes mounted on velcros right under the headlight assembly. There is only one connector and I had to test the lights to figure out which one was which.

Fast forward few hours at my dad’s garage, and I got the cowling back onto the bike. Didn’t have much time left so didn’t take any pictures. Here are some from today though:

The original:

The NEW Look:

Now I just need to align the headlights and install the side panels in the cockpit. Almost done!!!!!

MiG Mods – Day 1

Day 1. Replacing the Cowling. Mounting Givi sidecase racks. Trying to Start

This is the goodies!!!!

Funny thing – I ended up with some “extras” in the box with the oem cowling I ordered – a whole bunch of gaskets, transmission parts (not from FZ-6, unfortunately) and some floor mats, that look like they belong to a scooter or, maybe, a waverunner.

Cowling
This is what the old cowling looked like:

While replacing it, I realized how badly bent the cowling bracket was at the point where the left mirror is mounted – i couldn’t even remove that mirror. I spent good 20 mins trying to shape it, and it will work for now, but i’m going to get a replacement.

Starting the Engine
I also tried to start the engine (I did not connect the battery to the tender when i put the bike into storage). Sure enough, the battery had only enough juice to display time. And my new YUASA charger wouldn’t recognize the battery. So what I did was take a regular 9V battery, made “jumper” wires and for a brief moment connected the 9V battery in parallel with the bike’s battery. My logic was that if the charger is “looking” for voltage, it should react to the spike caused by 9V battery. WARNING: Do NOT try to do this yourself after reading this post – I am known to try stupid things and take risks without really thinking what consequences could be – chances are, I just got lucky, because the charger switched into Charging mode.

Er-1 Code
After a few hours of charging, I tried to start the engine again, only to get the “Er-1” code. The fuel pump runs, the starter relay is ticking, and nothing. I brought ECU into house, and waited until the battery was charged, then replaced the ECU and voila, the bike started! Whether it was ECU or the battery, i am not sure.

Here is a short lapse-time video

MiG Mods Pipeline

Alllright, most of this white sh… s… stuff is gone, I’m almost ready to start the season.

I’m just as excited as i was last year when i rode my KLR in January.
After long, cold, sad winter that seemed like it would last forever, I’ve gone shopping for the new season. Yes, i got tax refund, as you can tell:

  • Replacement OEM Front Cowling – after my fall, i thought hard whether or not to expose myse… i mean… go naked, but decided to stay with cowling. One of the decisive factors was the fact that i can fit switches and buttons better on the cowling (and i’ll need some, given other mods).
  • Decals (my “MiG” decal is gone with the old cowling). flightlinefabrications guys are great as always… Not sure if by mistake or out of good will – i ordered 1 decal and they sent me 2. I’m also thinking to get a couple of custom decals in “russian fighter jet” theme.
  • Puig Windshield (dark smoke) – i’ll compare it to my new OEM shield, and the winner will stay.
  • Givi E21 sidecases – after deciding between E21s, V35s, and E41s, I decided to sacrifice capacity to have narrower rear.
  • Stebel Horn – from what i saw on twistedthrottle, that thing sounds like a EMD SD-40, all i need is add the bell. I’m thinking to have a “highway mode” switch
  • Shipped my stock seat to Spencers Motorcycle Seat Mods this morning. After failing to mentally prepare myself to pay for a TS seat, I learned here about Spencer. This forum rocks, nuff said!
  • Ordered HID kit with Angel Eye from hot-bid88. Wanted this mode ever since I bought the bike, so let’s see if i can make it work.

Something tells me i’ll spend considerable amount of time at my dad’s garage in the next few weeks. Can’t wait!!!!!

Ads

back in the saddle (and/or this site)

I completely abandoned this blog yet again – there is a lot going on in my life right now, and I have a feeling the next few months will have a big impact on my life. So, to catch up:
I am now a proud owner of a blue 2004 Yamaha FZ6.
I bought it at a very reasonable price in the beginning of July and I’ve already put 1.5k miles on it. I absolutely and positively love it! There is the beauty

Even before I completed the purchase, I joined www.fz6-forum.com. This is one of the best online communities I’ve ever seen! The amount of information is astounding and everybody is very helpful.

Of course, the first thing I did was to start getting accessories and mods:
Givi V46 Topcase with brake light repeater and a back-rest for the passenger- for touring and commuting.
Gorilla Alarm – yeah, I learned my lesson. Sure, it will not stop a determined thief, but at least it will scream
Centerstand – gotta have one, especially for maintenance.

Speaking of maintenance, one of the things I had to do was replacing the head bearings on the FZ. I have a feeling the reason why PO was willing to part with the bike at such a low price, was the need to replace them (the bearings). Oh well, $25 for the bearing kit by All Balls (ironically, the new bearings are roller bearings, not ball bearings) and a day of work, which lead to my learning quite a bit about the machine itself.
Here, FZ6 half way through the “surgery”. The patient’s pulse is stable, the body is partially suspended from the ceiling by straps (this is why one needs a centerstand):

And the only way I learned what I needed to do and (more importantly) how, was, the FZ6-forums.com I can just hope to contribute my fair share to this great community.