In 2006, I signed up for fotki.com – a great service at the time. For a small yearly fee of $30, they offered unlimited storage capacity for photo galleries, and provided an alternative solution to all-too-common Flickr and Picasa. I loved the interface and the amount of control over the galleries I had, so I gladly became a premium member for $30 a year.
Over time I’ve accumulated a considerable amount of photos on the site (about 2.7Gb), some of the pictures being originals uploaded to the site. Nothing spectacular, just a lot of my snapshot-taking.
Fast-forward to 2013 when I started considering moving all of my galleries to a different platform – the look and feel of fotki platform has gone stale over 6 years and hadn’t really been updated, nor did it have integration with mobile and interoperability with other services. At that point, in April, a friend of mine who also was using fotki for a while forwarded me an email he received from them in 2012 declaring that to deal with the rising costs, they are forced to introduce a new level of membership that would have “FTP Access to your originals”. So, in essence, they decided to cut off FTP access to the originals I’ve uploaded to their “unlimited storage” hosting, until I pay them for a new level of membership.
That left me a little annoyed, – I can understand that small businesses have to deal with rising costs, and I honestly would have paid an increased membership, but positioning it as a new level and cutting out my access to my uploaded photos rather than to new galleries – that’s a little too much. At this point, however, I’ve already found a suitable replacement – smugmug.com and was ready to move on. So, I paid the additional $30 for Premium Gold membership – if anything to just get my photos out.
After downloading all of the galleries, something odd attracted my attention – the total size of the downloaded folders was just over 200 Mbs, meanwhile the amount of storage used on the server was 2.7 Gbs. When I contacted their support, they explained that not all of the originals were online because they were affected by Hurricane Sandy in 2012 and had to move to a different datacenter, and that the remaining originals will be back online “in a few weeks”. When, in my opinion, reasonably I asked for a refund for my just paid Premium Gold membership, I was told that they “don’t offer refunds”!
I’m not going to post what I think of them. One simple fact – I contacted their support in April 2013. It’s been 4 months and during this time nothing has changed. Every time they get back to me, it’s “a few weeks” and “few more weeks”. I’m about to close the account, giving up on some of my originals.
Final Thoughts: It’s really sad to see a good business gone bad. I’m not sure what happened – maybe they didn’t scale up to make the numbers work, maybe they changed management (I haven’t really looked through their blog – it now starts to show errors left and right, so something tells me the infrastructure is about to go). I am certainly left with a bad aftertaste and feeling cheated by what originally was a good and promising service. Bye-bye, fotki.com!
With winter coming (way too) soon, I decided to add heated seats to my s/o’s car, and here is my experience. Overall, so far I am very satisfied with the product, despite few minor things that I would change.
Ordering
After a little bit of research online, I came up with HeatedSeatKits.com (HSK), also known as Autowarm.com as a potential source of the kits. The kits I got were Innovative Heat II kits which cost $90 and come with 2 heat settings and are advertised as their most popular and universal model. Each kit includes two pads – one for bottom cushion and one for back cushion – wiring harness and 3-position switch.
I placed order on their website on Monday morning, via fairly simple process. The $90 includes shipping, and in addition I bought a suggested $20 installation kit, for the total of $200. One thing that bothered me a little was the fact that when I placed the order, I did not receive a confirmation email that would contain any kind of order information. However, I did not get to wonder about that for too long because, to my surprise, I found my order at my doorstep on Tuesday! the order was shipped from WA to CT via USPS and got there in one day. That’s impressive, I have to say.
As it turns out, there is a page where you can find status of the order and even order reference # using full name OR a zip code (!), but I still believe these days email is a must.
And so, off the the races. Here is the target (the one of the right, not the one on the left, though, HSK sells a heated seat kit for motorcycles, and I am curious about it):
Target: Subaru Impreza 2008
Here is what the kits look like:
Heated Seat Kits
Installation Manual(s)
One curious thing is that the kits do not contain installation manual. Instead, there is a sheet of paper that informs the recipient that manuals are not sent as a part of being more environmentally friendly, but PDF manuals can be found online. The link given leads to autowarm.com/manuals page that contains 3 different manuals. Alternatively, a manual can also be found under Installation tab on HSK’s site in both PDF and HTML format (“HTML format”, in this case being collection of 7 images – one for each page, NOT a searcheable page).
All of the manuals refer to separate “bottom” and “back” pads, difference being the bottom pad having 4-wire connector versus 2-wire connector in the back pad. According to the manual, the bottom pad contains temperature sensor. Both of the kits I received, however, contain identical pads – with only two wires coming out (the wiring harness also only contains 2-wire connectors for pads). The pads, however, clearly have some electronic element stitched in them, which could be temp sensors (afterall, all the element needs to do is turn off the power once the temperature of the pad reaches certain level, it can be done “locally”, on the given pad, vs sending signal back to the wiring harness and relay).
To make sure, however, I wanted to contact HSK tech support. Unfortunately, HSK does not have a technical support to call, and questions need to be submitted via online trouble ticket system. HSK took about 4 hours to reply and their reply was: “Yes, that is correct as the new models come with two 2-wire elements. They are interchangeable so the elements can go on any cushion. The instruction manuals are universal, therefore that does not apply to the new models.” Given that they maintain multiple different manuals online and don’t print them anyways, they could have done a slightly better job with manuals, but oh well.
Installation
Airbags
2008 Subaru Impreza comes with SRS sidebags installed on window side of each seat, and therefore, before removing seats (which will involve disconnecting the airbag wiring), it’s important to disconnect the battery (the installation manual mentions it as well) and wait for a few minutes, to avoid having to go to a dealership to fix “Airbag Warning” light. I’m no mechanic, but as I understand it, car’s computer(s) test airbag system and if they find one of the airbags not “online”, warning light is lit, and even if the bag is reconnected later, the system is considered compromised and needs the be checked.
Upholstery
After disconnecting the battery and removing the seat (which in Subie is attached to the body via 4 bolts), the next step is to open the upholstery for both bottom and back cushions. The manual suggests disassembling the seat to separate the back and the bottom, but I didn’t feel like having to deal with the springs and sliding mechanism (mind you, this Subie has manual adjustments, not electronic ones), so I simply started lifting the seat covers hoping to be able to insert the pads, once I get access to most area of each cushion.
Here is the view of the bottom of the driver’s seat with covers lifted.
Seat Cover Removed
The stitching on the seats (which keeps the covers from sliding) is attached to the seat springs using small metal rings, known as hog rings, which need to be removed. I’ve never dealt with upholstery, and frankly, I found the process a real pain the butt, but eventually I figured out a way to do it using pliers (the installation kit included hog ring pliers, but I couldn’t figure out how to use them, nor was the tool’s handles were large enough to produce enough leverage). When putting the seats back together, I used zip-ties instead of hog rings, as metal hog rings would conduct electricity to the spring, which in best case would mess up the flow of electricity, and in worst case cause a short.
Fitting
The pads can be shortened (I ended up cutting the pads for the “backs” of the seats), but not cut in width – they are about 11 inches wide. If the pad’s placement happens to be under a stitch line holes may be made to place hog rings (or zip-ties) to connect the stitch line with the springs of the seat. One of the stitch lines on Subie’s seats is parallel to lateral axis, so one way or another, I’d have to have heating pad going through it, which means having to make at least two holes in the pad itself. Manual describes the process of making holes which is fairly easy to follow.
After cutting the holes and pulling the wire to the back of the seat, I placed the pad and started to pull off the paper that protects the sticky “sides” of the pad.
Bottom Pad Being Installed
With the pad placed on the seat cushion, it’s time to put everything back together. First things first – prepare the new “hog rings” – zip-ties:
New "Hog rings"
Before fully closing the bottom cushion, I switched to the back of the seat. The steps are the same: lift the cover, place the pad, close the cover. In my case, I had to shorten the pad in order to fit it in the seat. Here is marking the pad before cutting (you can see a faint line made by pencil on the pad).
Makrking The Back Pad
I chose not to fit the pad all the way to the top of the seat because that would require removing entire cover, which, in turn, would make me disassemble the seat. I figured most of the heat is felt in the lower back anyways. Here is the cutting
Cutting The Back Pad
And here is the placed pad before putting the cover back on.
Back Pad Placed
Here is the view of the SRS bag. Proceed carefully, try not to drop the seat onto that side 🙂
SRS Airbag
Here is the view of the wires run in the back. I ran wires from both pads to the side and under the bottom cushion’s flap.
Running The Wiring
Here is what the driver’s seat looks like at the end – you can see two black wires coming out from under the flap. The passenger’s seat is very similar, but it also has a sensor, so wiring is a little more convoluted.
Driver's Seat Bottom View
Wiring
The wiring harness is a relay unit which has one 2-wire power connector, one 3-wire switch connector, and two 2-wire pad connectors. pad connectors are by far the shortest ones (about 12 inches or so), and power and switch connectors approximately 40 inches. I initially thought of placing the harness itself on the seat itself, since the pad wires are the shortest ones, and running the wires for power and switches from there. Unfortunately, the connectors on the power and switch cable are much on the opposite side of the wires from the relay unit, which would mean that they would end up somewhere underneath the central console, and if I ever had to remove the seats, I’d have to get in there in order to disconnect the wiring. Because of this, I placed the relay unit under the floor with pad wires being connected to the seat. Their length was just enough to support the full range of motion of the seat, and now to remove the seat I have to disconnect the pad wires. This takes care of the seat wiring, but still leaves out the power and control wires. While both of the wires are long, the connectors are located differently – control wire connector is about 6 inches from the switch itself while power connector is about half-way through the length, placing it under carpet on vertical side of transmission tunnel under central console. Maybe a small nitpicking, but I would prefer if the power connector was next to control connector which would make it accessible once the central console is lifted.
Harness Placement
Subie comes with placeholders for the heated seats switches on the central console, which is where I decided to place the switches. Eventually, I’d like to get the stock switches, but for now I went with the ones provided with the kit. Luckily, armrest also contains cigarette lighter socket, which perfect for tapping into for power (it’s inside the armrest, so will most likely be used for charging an ipod or something similar, without much consumption).
2-stage Switches Installed
Here is the view of the final result:
Final Result
Tools
I ended up not using the installation kit provided apart from the wire tap-ins. Here are all the tools I used:
Wire cutters
Insulation Tape
Flat Screwdriver
Philips Screwdriver
Pliers
Knife
12mm socket
14mm socket
Scissors
Zip-ties
10mm wrench (to disconnect the battery)
Tools Used
Lesson of the day: “Invest into good quality tools” – the old pliers that I had (got them from one of those cheapo toolkits) broke when I tried to use them to remove the hog rings.
"Invest Into Good Quality Tools"
Use
After putting everything back together, I tested the seats with… well, my own behind. The seats take some time to warm up, but the heat is definitely intense, I would think that it’s even more intense than “stock” heaters on my 2005 Saabaru. I got an impression that the second time the seats heated up more quickly than the first time I turned them on, but it may be an illusion – I will monitor more and will report the observations here.
Conclusion
Overall, I am happy with the kits – it looks like they are well made, the company shipped them quickly, answered my questions expeditiously (always wanted to use this work – ever since I’ve seen Oscar with Sly) and installing them was fairly easy. I would recommend this to people who are comfortable with small DIY projects and know how to work with automotive electronics.
Here is some nit-picking:
An order confirmation email when the order is placed is a must – come on, people, it’s 21st century
Manuals leave much to be desired – if you maintain them online, it’s not that difficult to update them – even if you have multiple models
“HTML format”??? really? it’s a collection of pictures! HTML should be searcheable
Connectors on power wiring could be closer to the end of wire (away from the relay unit) – this one is due to my placement, YMMV
In short, New York Airport Service which I used to get from Manhattan to LGA or JFK has deteriorated in its service quality to the point where I would not recommend anybody to use it.
In the past two years, whenever I had to fly out of LGA or JFK, I used NY Airport Service (NYAS) from Grand Central. For about $20 you can get to JFK in about 40 minutes (depending on when you fly out, of course). The buses were not the cleanest, but they ran on schedule and picked up passengers from Grand Central (corner of 42nd street and Park Avenue). I never had to wait for more than 10 minutes – as soon as particular bus arrives, they would let you load your luggage into the bus and take a seat. Tickets are collected quickly, and off you go.
Recently, I had to fly out to Chicago for an interview, and having to fly out of LGA, I followed the established routine – book the shuttle online, take a train to Grand Central and walk over to the corner of 42nd and Park. For some reason the buses looked newer, which I took as a good sign. Alas, my joy was short-lived – apparently the buses I saw belonged to a different shuttle company and I was told to wait inside (there is a small ticket location on Park Avenue side). There I had to wait for 20 minutes before the buses that “are not here yet”, according to a man who was apparently in charge. It should be noted that in the past people who worked for NY Airport Service wore uniform – this gentleman wore regular suit and tie. 25 minutes later, the buses were still not there, at which point people waiting in line started expressing their concern, to which one of the NYAS staff replied with simple “they are not here yet, do you want your money back?”. Not exactly the communication you’d hope for.
Another 5 minutes passed by and we were told that the bus is here and we can board. Strangely enough, the boarding was not on Park Avenue sidewalk, but “there behind the corner”, on 41st street. When the crowd, which was already wondering if it should have spent extra and just get a cab, made it to the said location, lo and behold, there was no bus and not even a uniformed staff to direct us. Another 5 minutes later waiting while periodically running back to the ticket booth, and we finally here that the “bus” is here. A small side-track here – if you go to NYAS website, in the center of the page you see a picture of Motor Coach Industries Detroit Diesel series 60 bus – and up until recent times, those are exactly the buses they were running. What we saw, unfortunately was a van. Granted, it was newer, but still it had just enough space for us.
Once we loaded up into the van, we were puzzled to hear the driver of the van argue with staff member as to where he is going. According to the driver he WANTED to go to JFK, despite the fact that passengers that were already loaded were going to LGA. Eventually, the driver was convinced that he needs to go to LGA, at which point we started started moving and collecting the tickets. in the process it became clear that out of 7 passengers, 5 were going to LGA and 2 were going to JFK!
One of the passengers told us that apparently NYAS’ contract expired (not certain which contract it is) and now they use vans instead of buses and pick people up in a different location.
I’m sad to see a good service go down the drain, but it is obvious that NYAS dropped the ball. I don’t think I’ll use their service anymore.
Yesterday, after getting my Class 4 16Gb microSD card in the mail, I finally had a chance to test the battery life of the camera. My result is about 2 hours 50 minutes continuously shooting HD/30 video with GPS unit activated. During this time, my position was mostly stationary with clear view of the sky, so it’s possible that the battery would have been drained faster if GPS signal was interrupted from time to time. I periodically pressed the video button to bring the screen to life and see if it’s still recording (I’ve set the privacy mode to be my default – possibly another factor, though given how efficient LEDs are, I doubt it)
Memory Use
During the test, the camera wrote three video files – 2 files 3.8 Gb each and 1 file 2.7 Gb with the larger files being approximately 1 hour 04 minutes long and the smaller file being approximately 40 minutes long.
Motorcycle Noise Issue
As I mentioned in the main review, I experienced an issue with a high-pitch noise appearing during the acceleration when mounted on the handlebar using the provided handlebar mount. Trying to alleviate the problem, I’ve replaced the rubber fitting that sits between the mount and the handlebar with special sorbothane, hoping that the vibrations would be absorbed. Unfortunately, the sorbothane fitting did not help – it “delays” the appearance of the noise, but does not eliminate it – so, the quest for mounting camera on the motorcycle continues.
Good camera, overall, many interesting features, that I hope will become more standard on other “action” cameras: snapshot ability, waterproof w/o any case, remote control, G-force sensor, and optional GPS unit. Not so good mounts (though, at least some of them), especially NOT motorsports-optimized, below average PC software UI. Above average video quality. Good controls. You will need to come up with some mounts yourself, but once you do, the camera performs great.
Intro:
This past summer I played around with GoPro HD camera, and I liked it overall, but did not care for the controls, and having to switch backs back and forth. Controls of the camera are plain horrid! Do you really want me, the popcorn-chewing consumer, to have to memorize what those numbers mean? Anyways, back to store the camera went, and I thought to myself, “the ‘action’ cameras are still somewhat ‘raw'”. Fast forward 6 months, and I’m revisiting the camera question – I’d like to take some videos and pictures while riding, and I don’t want to mount Canon 7D onto the bike. After much research and thinking whether I should bite the bullet and go back to GoPro, I decided to give Oregon Scientific ATC9K camera a try. I got it from REI.com (20% off coupon and some dividends helped 😉 ) with the optional GPS module and after few days of waiting, here it is, in my hands.
Packaging and Contents:
The packaging looks impressive and promises video/photo paradise on earth. I like the black/yellow color scheme – very Monster Yamaha 🙂
The package includes: camera itself, li-polymer battery, remote control, synthetic camera carry bag, helmet mount, handlebar mount, velcro and silicon straps, usb cable, front and rear protective caps, and hdmi cable. The required microSD Class 4 memory card is not included.
External Features and Controls:
The controls are fairly simple and intuitive (watch and learn, GoPro!) there are two large buttons on top of the cylindrical body – one for taking a snapshot, and another one to start/stop the video recording. You cannot take a snapshot while making the video. The rear of the camera has 1.5 inch LCD screen (refer to the earlier comment, GoPro, no need to pay extra to get a “backpack” to be able to play the video) which I found sufficiently bright to view video on a sunny day. The screen contains all the needed information: shooting mode, exposure compensation, quality, photo quality, white balance, battery status and timer. There is also an optional leveling aid with longitudinal (roll) and lateral (pitch) indicators.
There are 5 control buttons under the screen: Menu, Previous, Play/Pause/Ok, Next, Power. These buttons are just the right size – I can even work them wearing summer motorcycle gloves – and they require some force to be pushed, so accidental activation is not likely.
One of the reasons why I got the camera is the remote control. It’s a nicely sized remote with buttons matching control buttons on the camera, minus the power button. The remote is NOT waterproof – something that I think Oregon Scientific could address – why not keep the “all-terrain” style in all working parts? Meanwhile, I’ll have to improvise:
The remote seems to work at distances up to 10 ft., with one IR receiver only in the front of the camera.
Speaking of the front of the camera, here is the frontal view – the lens is set inside the plastic rim, so the camera can be put onto its front without damaging the lens. Right next to the lens, we have an LED indicator, laser pointer and IR receiver. The LED indicator shows charging status and recording status. The laser can be set to work for 5 or 10 seconds before the start of the video to align the shot.
Inside the waterproof door, we have the GPS module, the battery the microSD slot and HDMI and mini USB connectors (just when I hoped I could switch all my sync needs to microUSB, but Canon 7D uses mini as well, so I suppose i shouldn’t complain). The camera is waterproof to 60 ft./20 meters – not as diver-friendly as GoPro in its shell (down to 180 ft/60 meters), but the way I look at it, when you are at those depths, you have other things to worry about, such as pressure and light.
The only remaining external feature of the camera is the microphone which is located on the opposite side from the two main control buttons.
How It Works:
The camera powers up after the power button is pressed for more than 2 seconds and takes just about 2 seconds to power up. Luckily all the music can be disabled. Camera also has Privacy mode, where the camera will not make any sounds and will not indicate the recording status via the LED indicator.There are plenty of adjustments and modes to play with – on par with regular point’n’shoot cameras, which is pleasantly surprising, yet mostly useless, in my opinion.
GPS (optional):
One cool feature of the camera is the GPS module that is optionally available for the ATC9K camera. I am loving it – now I can record where I was without much thinking. The GPS module creates a .MAP file which is later read by Oregon Scientific software and plotted on Google Maps.
G-Sensor:
Another cool feature is the G-sensor which records the acceleration and velocity into the same .MAP file. The software that comes with the camera will display the information in parallel to the video as well as some statistics and charts, Acceleration plotted against time, for example.
Video:
The camera has 130 degree angle of view. Not as wide as GoPro’s 170 degrees, but good nevertheless.
There are few video modes available:
FullHD/30 – 1920×1080, 30 fps – approx. 9 minutes of video per 1Gb (source: manual)
HD/60 – 1280×720, 60 fps – approx. 10 minutes of video per 1Gb
HD/30 – 1280×720, 30 fps – approx 15 minutes of video per 1 Gb
WVGA – 848×480, 60 fps – approx 15 minutes of video per 1 Gb
These settings can be permuted with Fine, Good and Normal quality levels.
Adjustments can be made to Exposure, White Balance, Contrast and Sharpness.
Duration can also be set to 15, 30 seconds, 1, 2, 5, 10 minutes to stop the recording.
Pictures:
Picture quality can be adjusted:
Resolution: 3 or 5 Megapixel
Quality: Fine, Good, Normal
Adjustments match those for the video mode, and there is a night mode available, which boosts exposure.
There are some neat features for taking pictures periodically: you can set 3 or 5 continuous shots with interval of 10, 20, 30 seconds and 1, 2, 5, and 10 minutes. There is also a timer for 5 or 3 seconds.
Sound:
The microphone sensitivity can be adjusted between Maximum and Medium. No inputs for external microphones on this camera, but i’m guessing that’s the price of having a waterproof camera. Overall, the sound is good, however there is one problem I have noticed – when mounted on the handlebar of my Yamaha FZ6 using the included handlebar mount, there is an extremely loud high-pitch noise that appears during acceleration above 8-10 mph (warning: loud noise):
Originally, I suspected wind noise (some sort of a turbulence, given the location of the the mount vs location of the microphone, but I noticed an interesting thing – the noise goes away during the deceleration , even if the speeds are significantly higher than 8-10 mph threshold. I decided to see if the sound would be there if I mounted the camera elsewhere:
There is still strong wind noise, but the high-frequency sound is gone. Also, you can see how shaky the mount is.
After mounting the camera on my helmet, and NOT hearing the same noise, I can only conclude that the noise comes from the frame/mount combination. I sent a letter to Oregon Scientific Customer Service to see what they have to say. I am going to have to look into dampened camera mounts, I guess. Additionally, you can see that the narrow view angle does not work well with the handlebar mount.
As far as wind noise, I think it can be fixed with something along these lines:
Software:
The software that comes with the camera causes mixed feelings. On one hand it’s an interesting piece combining the video window with Google Maps, and acceleration,speed, distance charts and averages. Really good idea, but poorly implemented from the UI standpoint. The main window cannot be resized, nor can the components be adjusted. What if i don’t want to see my library all the time, but want to see a bigger video instead? I’m out of luck. Also, try to find the button that downloads the content form the camera! It took me few minutes of clicking and listening to “Exclamation” sound (see below). Response is somewhat slow, and highlighting of the buttons (available vs unavailable) is inconsistent. Every time you press a mouse button, Exclamation sound plays. Cute, but becomes annoying after about 1 minute, especially if you are trying to re-play something, or clicking around trying to find the needed function. Not very well thought through interface, Oregon Scientific, AND it doesn’t run on systems other than Windows. Another feature I don’t get is the “login” feature – why should I log in, even though, as far as i can tell the videos and pictures are readily available in the Documents folder.
The biggest flaw:
The mounts. I guess I got spoiled by GoPro “mount to anything” collection of mounting options. This camera is ok for a bicycle, perhaps, but the mounts are VERY flimsy.Here is how I mounted the camera onto the handlebar – this is the mount that caused the high-pitch noise.
(note the latest nano-technology modification to ensure that camera stays still)
I wouldn’t take this camera/mount combination to a DH worrying the plastic would just snap. I remember mounting GoPro on the swingarm of my bike, for interesting video angle, and I will need to work out some sort of my own mount to do that with ATC9K.
Now, given the issue with the sound, I will have to look into dampened mounts, which will cost extra $$$. And I’m certainly NOT entrusting this piece of electronics to this little piece of plastic to hold my camera on my motorcycle:
Conclusion:
In my dilettante opinion, this is a good camera for recording action, with some very useful features, such as waterproofing, remote control, integrated LCD, G-force recording, optional GPS unit. The video quality may not be the best, but it is at least very good compared to others. The sound is decent. The weak spot of this camera is the mounts that come with it – not enough of them and the ones that are there are not strong enough for hardcore applications. This camera would be great helmet camera for motorsports, DH biking, sky-diving, but the mounts are not up to par. Software gets another negative comment – it is something that looks like a good idea, but has confusing and not intuitive interface. Overall, I am keeping this camera, but will have to invest money and time into making my own mounts.
Last Friday I was able to buy nook at Barnes & Noble on Upper East Side. Turns out, they are already available in that store and in the one at Union Square. I have never had an electronic book reader before, so the following are my impressions being a first time electronic reader user. The software version I have now is 1.1.1, so all my nagging below is pertains to that particular version, unless otherwise noted.
Exterior and Packaging: I really like the way it was packaged – it’s not quite like unpacking some Apple product, but it’s definitely better than average electronic device. The packaging is minimalistic yet elegant.
The feel of the unit itself is very nice – good size, fits well in my hands. I like that buttons allowing you to move forward and back are on both sides of the unit, but I keep wanting to use the forward button on the left side to go back, when I’m holding nook with both hands, but that’s a minor detail.
Interface: It seems that the interface was developed with simplicity in mind, which is great, but it looks like implementation is where the problems are (as is often the case). Navigation is not very smooth, has a lot of glitches (example: navigation going back out of a blue). But again, this is a new product on a new OS, so they can probably work it out later – Blackberry Storm wasn’t very smooth either at the beginning, but two serious firmware updates later, the look and feel has definitely improved. I’m just hoping B&N will do it for the current nook model, not for next one, so that we spend another $250 to upgrade
Reading: Well, the whole idea of the unit is to enable the user to read a book, and it does so relatively well. It’s not quite a paper, yet it’s definitely not a computer screen, so I enjoy reading on this unit. Once the book is loaded, you have simple controls: you can go forward and go back using the two pairs of buttons on each side and some additional functionality via the touch screen: search within the book, go to furthest reading point/cover/chapter, bookmark control (add, go to, remove all), control the font, add highlights and notes, look up definition of a word (neat!) or Open Audio Player (see below) Interestingly enough Go To lacks ability to go to a certain page, only chapter. I think this would be a worthy addition. I liked how quickly the reader loaded a 100Mb pdf monstrosity named Pilot’s Handbook Of Aeronautical Knowledge – even FAA on its site posts it broken up by chapters, so I downloaded it and combined.
Organization: I was particularly excited about being able to load my 1.2 Gb pdf library onto the reader to have all those books readily available. And here is where I found out that nook does not support folders on the memory card! Imagine over a 100 books all listed alphabetically. Yes, this is not a sight for the weak of heart. There is no search either! No tags, no “read”, no categories – no way to classify them. Well, in my opinion, that really decreases the value of the reader. Essentially, the reader simply becomes a “screen” for reading versus a device that helps you organize and keep track of books. Now, from what I learned about Amazon’s Kindle, it’s suffering from the same flaw, yet there is talk about having folders.
It’s odd that such feature was not thought of to begin with. If you are developing a unit with replaceable memory card and advertising thousands of books that can be stored on it – you should REALLY think about how you are going to organize them.
Audio: I like to read books while listening to music, especially classical music. So, one of the first things I did was load music files onto the memory card (as to not to fill up the scarce space on the unit itself). After I went to audioplayer, I could not see the files. The Nook Guide says:
“Your nook looks for audio files in these places:
In the folders my music and my audiobooks in the internal memory. Optionally, you can place audio files in subfolders of my music and my audiobooks if you want to organize files hierarchically
Anywhere on a supplemental microSD or microSDHC card, if present
Audio files placed anywhere else in the internal memory are not discovered by the audio player”
Strange, I’ve even placed few files onto the unit itself, but it still would not see the After restarting the unit and waiting for a while, I come to conclusion that it simply takes the player a long time to load the list of files. At the same time, when I went to audio player after a long period of inactivity it showed me an empty list! Better yet, when I kept on reading a book periodically checking whether or not audio player had a chance to look up the mp3 files, after 2 or 3 “checks”, the unit simply froze on me. So, when you wake up your nook, let it do it’s stuff. Don’t rush, or it will go into stupor.
Connectivity: GSM: I got to play a little with the Shop section of the interface. Very simple and very effective – run a search for the book, and get a choice of purchasing or downloading a free sample. The ability to do this is of course subject to AT&T coverage. Wi-Fi: The initial attempt of connecting the nook to my home Wi-Fi failed miserably – nook cowardly refused to connect to my WPA network. I will have to work on this a little more. B&N Hotspots: I have yet to test that capability.
Random Stuff: When connected to a computer via USB cable (btw, it uses micro-USB on unit’s end, which is great – when I travel, I will not have to haul a separate cable for it – i can use sync cable from my Storm and Tour), nook displays a message that says that if i want to use nook and continue charging i should unmount (eject) the drive(s) associated with it. Lies!!! I’ve done it. The message stays, and no reaction from the unit.
Conclusions: Despite all the rant, I still like my nook. Call it idealism, hopeful rationalization, or whatever you want. I like the fact that it’s made by my favorite bookstore and ties into its library. As far as glitches and bugs are concerned, I realize that this is a new product for Barnes & Noble, and they need to iron out wrinkles. If I had to guess, in the past few months they were primarily concerned not with how the units perform, but if they have enoughof them. So, now that they are rolling them out into the stores in the next few weeks, I hope the company will have an opportunity to take a deep breath and address the issues. I will leave out the discussion on whether a company should iron out glitches before rolling out the product, or deliver the product to the market asap, creating interest, demand and dealing with issues later. To summarize, these are the issues i’d like to see addressed, and preferably in the current model via firmware upgrade:
Interface bugs – smooth ’em out – the touch screen is a good idea, don’t let it down now.
Book Organization and Classification – folders are must would be great if it also had tags, categories, etc.
Audio Player – definitely needs improvement. If it’s searching for files on the memory card a message saying that it’s searching would probably be nice.
Barnes & Noble, you have a good potential product, you have a shot at capturing market – don’t let it slip away!
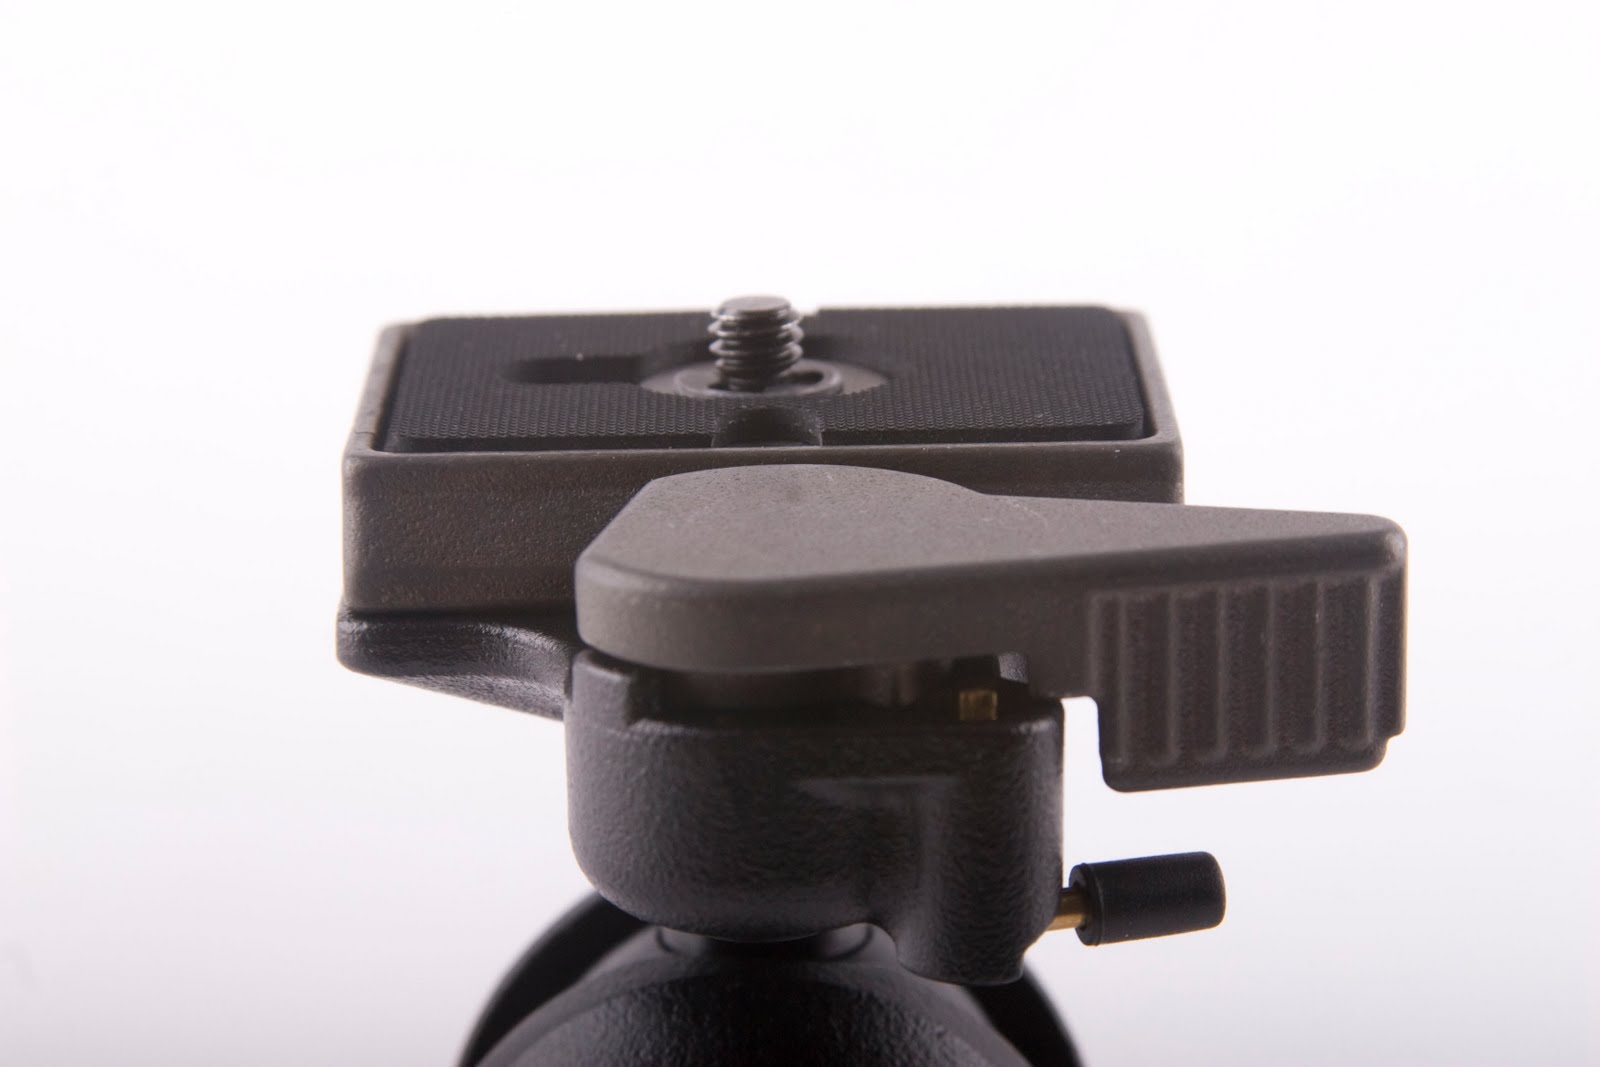
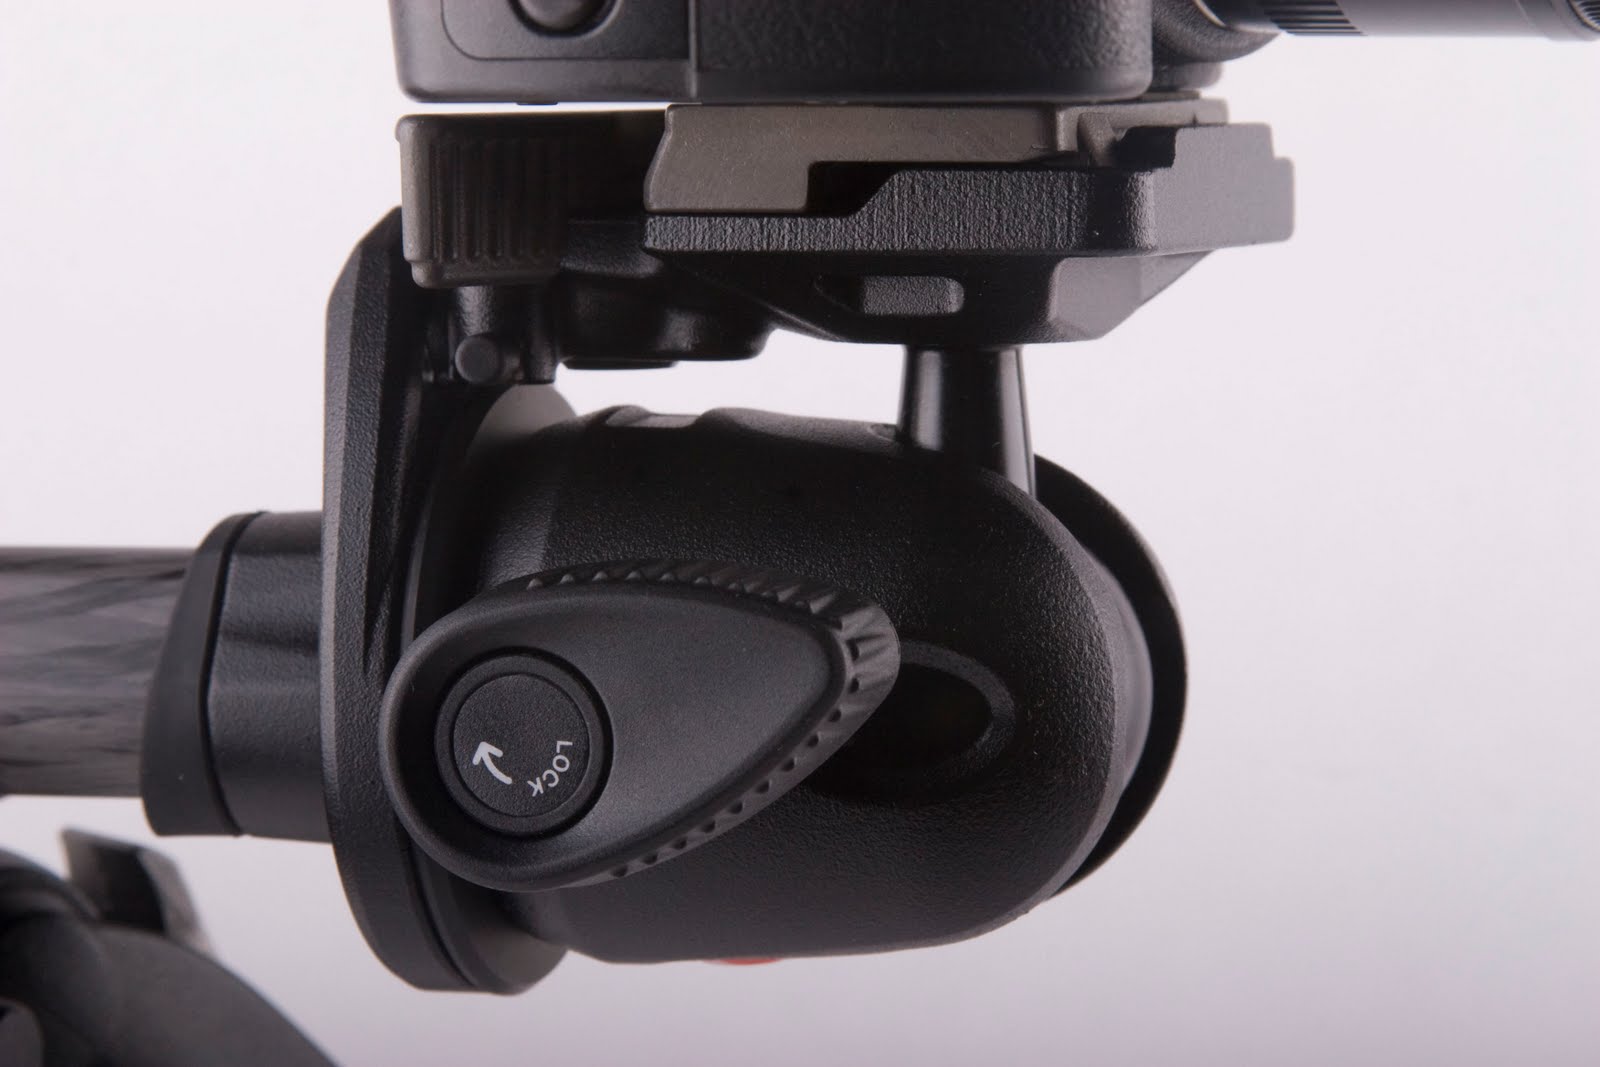
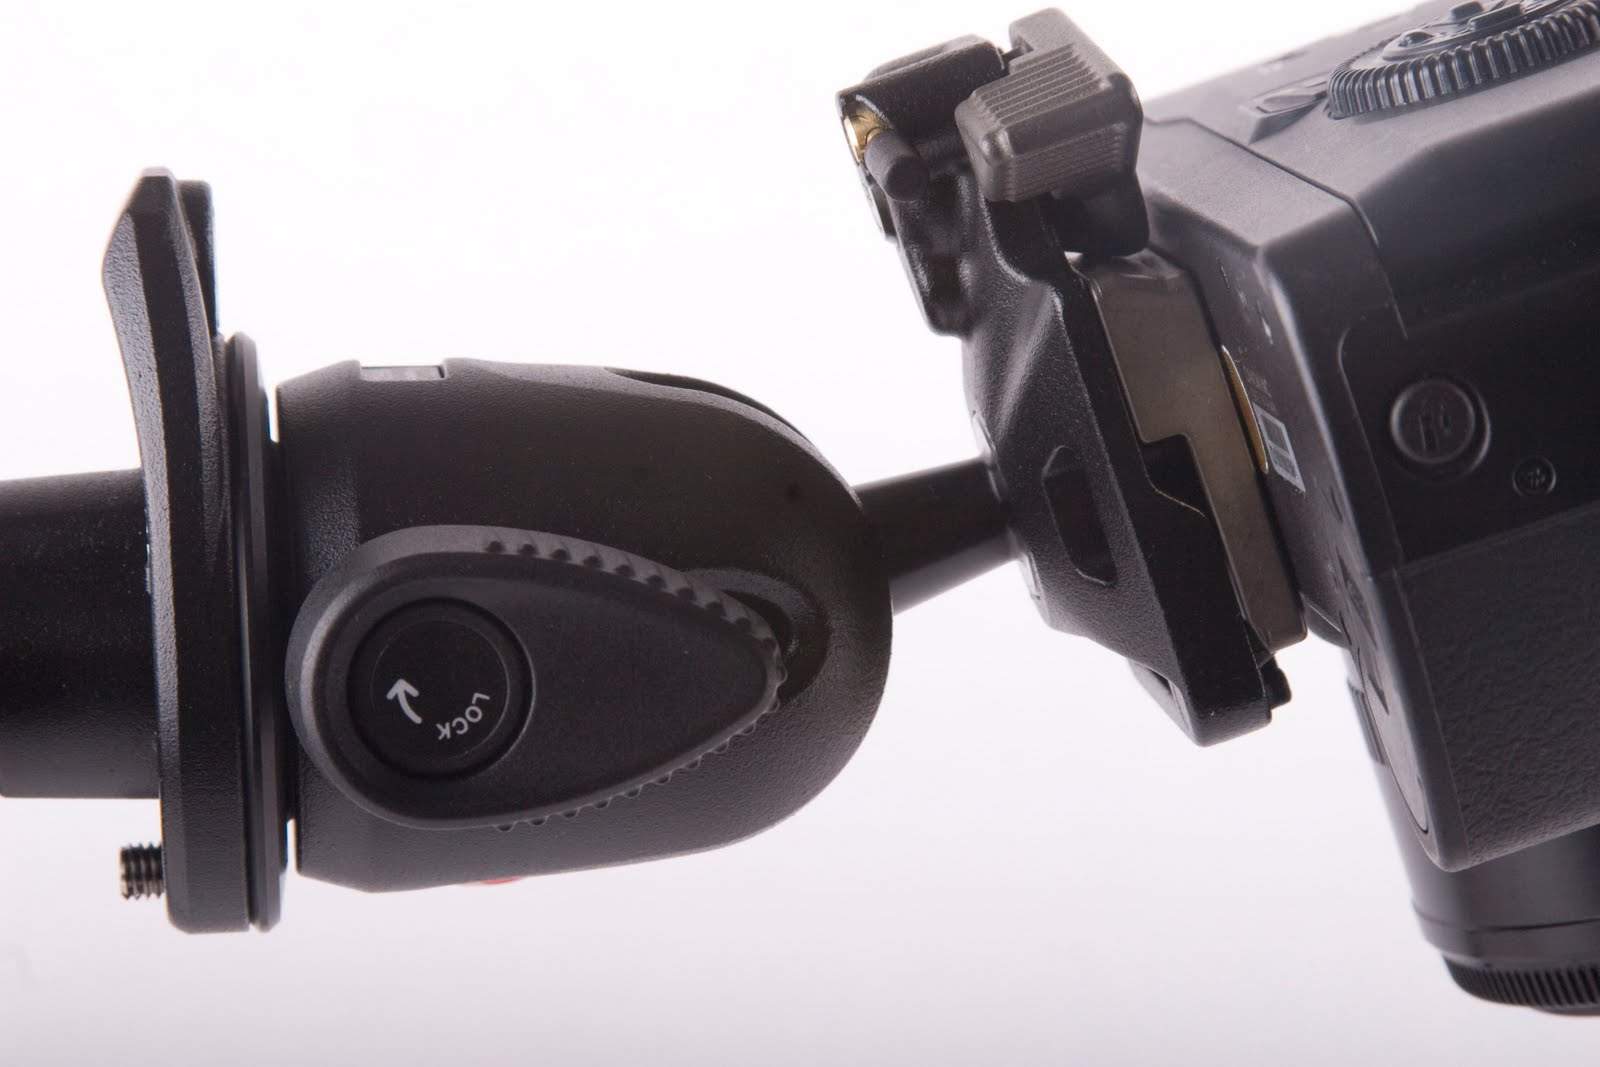
Today I received my 496RC2 (the 494, 496, and 498 come with RC2 quick-release plates, and 498 also comes with RC4 quick-release plate) in the mail from Adorama and got a chance to play with it. I once bought a 484 ball head when i needed something small to put on my tripod, but I returned it soon thereafter, as I found it too small and got myslef an 804RC2 3-way head.
There are few features that improve on what already is a great device. In particular, all of the heads, except for the smallest have friction adjustment, which is great – really puts this head on par with the 222 Joystick (Grip) Head.
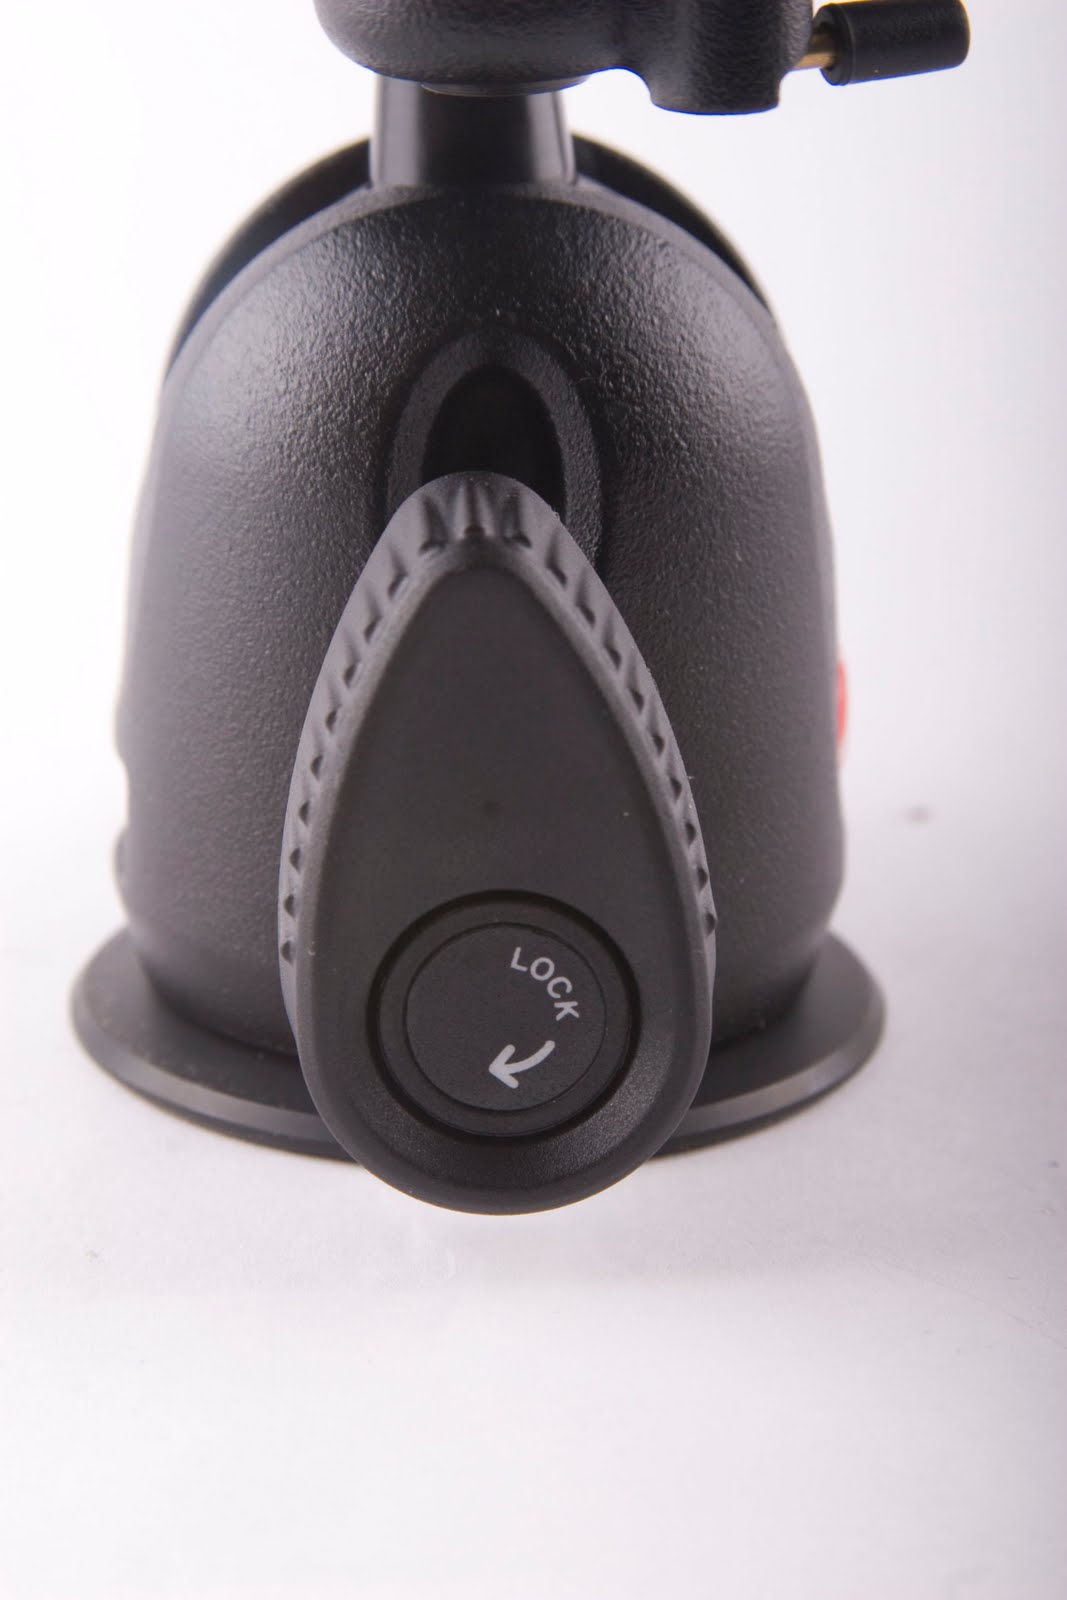
Lock knob (as well as the friction knob) is now a little more ergonomic – fingers are less likely to slip off the surface (486 had flat edges).
All models have 360 degree panoramic rotation. The 498 model has a separate pan lock.
It seems engineers at Manfrotto put additional thought into making the head lighter without sacrificing the strength – the 496RC2 weighs in at 0.93 lbs. – lighter than 1.01 lbs of its predecessor – may not seem like much, but I am sure it will make a difference on a hike or in carry-on. The way it was achieved is cutouts on the sides
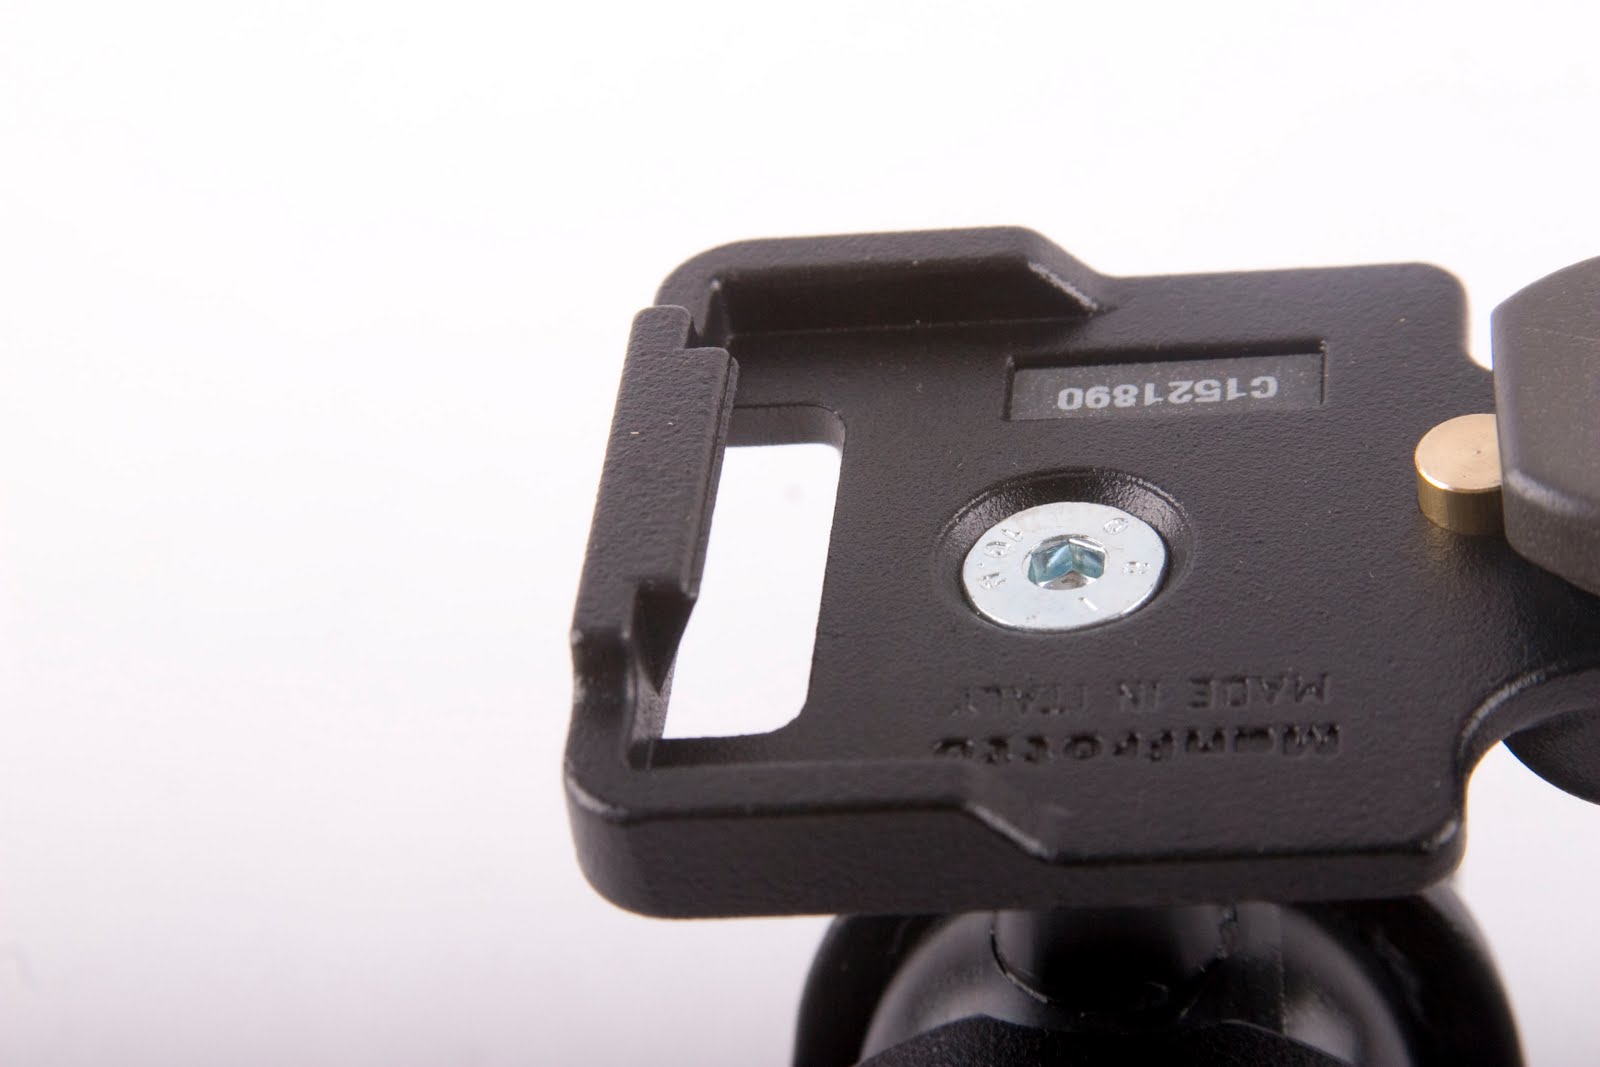
… as well as on the release plate assembly
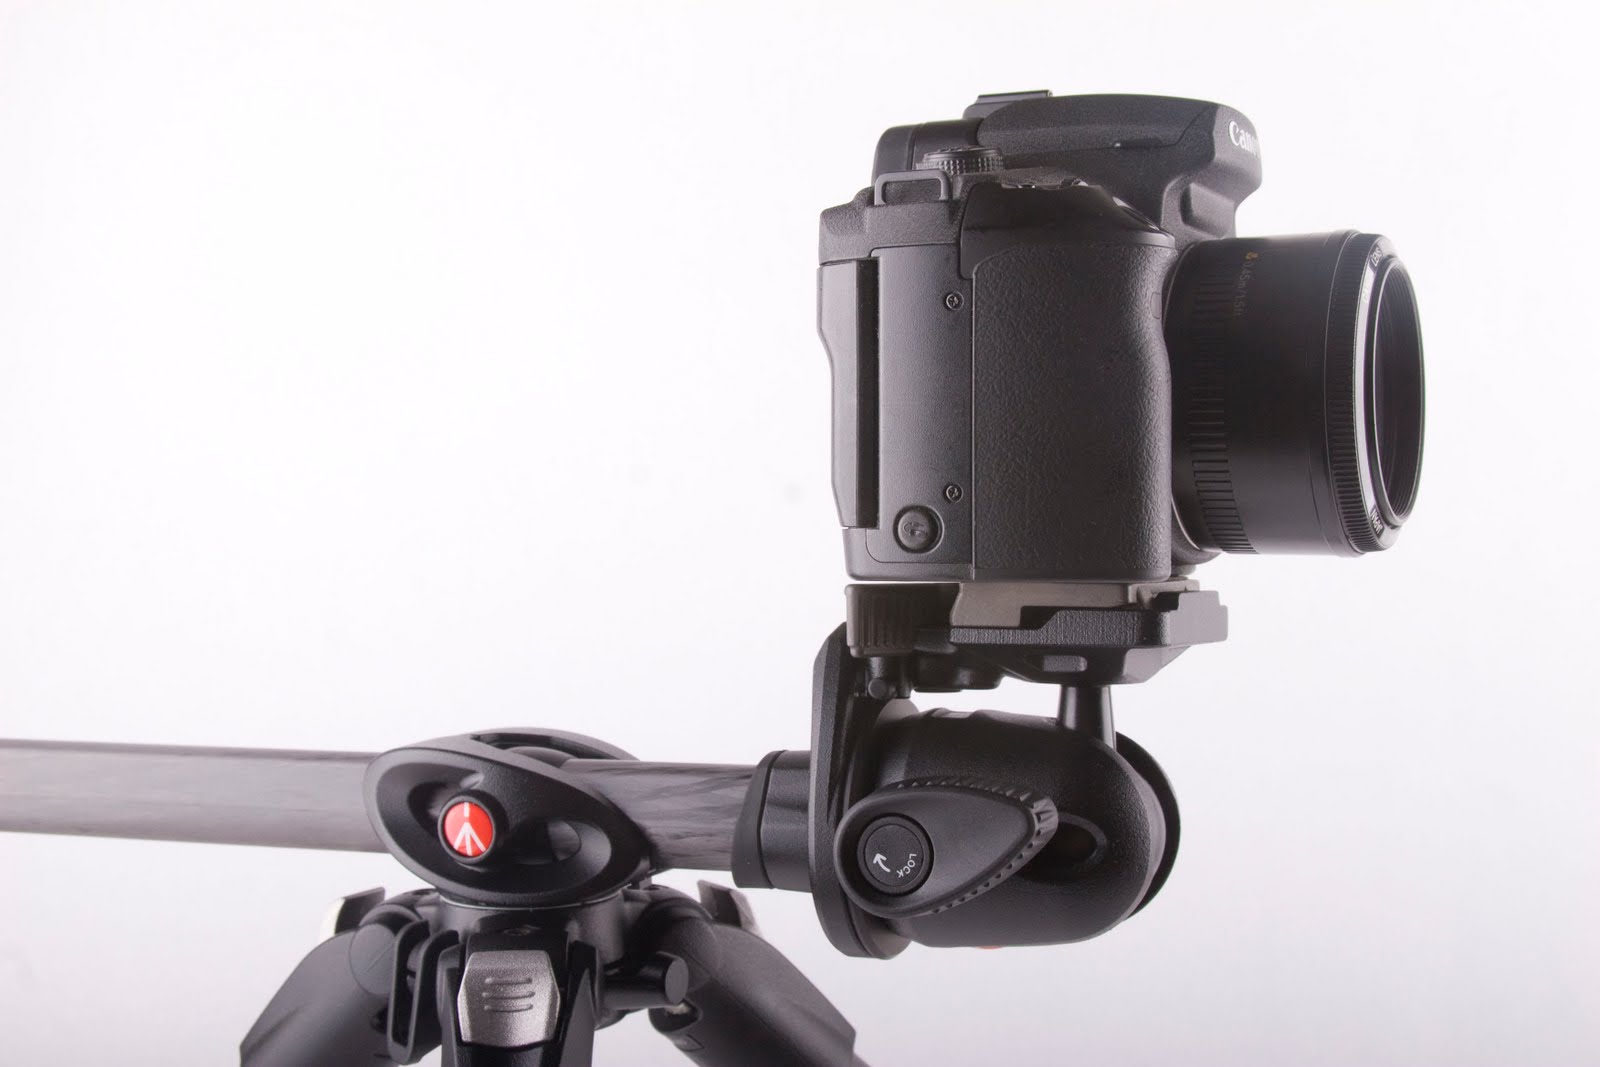
I know I’ll be taking this head on the trips, rather than the 1.72 lbs 222 joystick.
The only one problem i may have with this head is the quick release safety – it does not stay in unlocked position (as it does on 222, for example). I would really prefer it to stay unlocked so it’s easier to operate the release with one finger.
Overall, this is a great head, and I am thinking of selling my 222 in the near future. The construction is solid (as is always the case with Manfrotto), supports decent amount of weight (496 RC2 supports 13.23 lbs). I probably would not ditch a 486RC2 head if I had one to buy 496RC2, but as a new purchase of this type of head – this is definitely a “go”.
Here are few shots of the head on its own and mounted on my 190 CXPRO4.